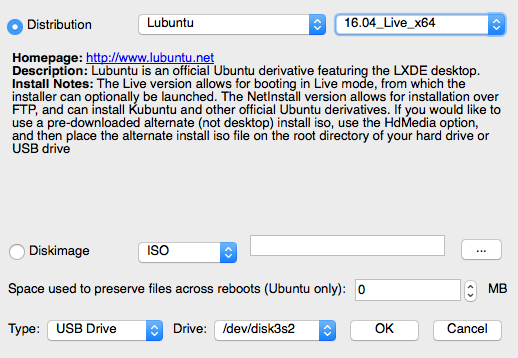
Start UNetbootin (with administrator level permissions if needed).
Select the Lubuntu Distrubution 16.04_live (Select _x64 if you want to install 64 bit mame, which we do in this case.)
Be sure to select the proper USB drive mountpoint above.
If your usb flash disk has been used before, it’s best to format it first.
If you have to format flash media I recommend the official SD formatter at sdcard.org
UNetbootin will load the bootable lubuntu image onto that USB stick and tell you when it’s done.
Step 2: Boot the linux installer and install Lubuntu:
Most semi-ancient machines can boot to USB volumes, but some need a special key or bios setting enabled. On this machine it was pressing f10 at boot time to select a boot device.
I’ll link outward to the official docs for installing lubuntu, they did a great job at explaining it:
note: it’s easiest if you DON’T encrypt homedir, and you tell it to auto-login your user.
The time it takes depends a lot on your hardware and the speed of your flash drive. But it’s not too bad to perform the install.
Step 3: Boot up and install some tweaks and tools: (Technically Optional)
Some of these are just things I did that I find useful for managing the system.
remote SSH access for remote management
VNC for remote-screen access over the network
SSH Greeter (stolen from RetroPie)
Install OpenSSH server for remote management:
Open LXterminal and use these commands to install and configure.
sudo apt update
sudo apt install openssh-server
chkconfig sshd on
ufw allow 22
the “ufw” command allows connections to port 22 through the firewall
You should be able to connect to your lubuntu host from the network, use puTTY on windows or terminal on mac or linux.
A quick way to find your ip address on lubuntu is:
ifconfig |grep -w inet
Then, you can use your remote machine to connect over SSH
ssh user@YOUR_LUBUNTU_HOST
x11VNC to remotely manage system:
Open LXterminal and use these commands to install and configure.
sudo apt install x11vnc
This is probably a machine on your home network, but you should create a password for your user:
x11vnc -usepw
This command will set the password file on it’s first run.
Your user should already be set to auto-login, so you should be able to start x11VNC remotely when you need it. SSH to your machine, Start X11 VNC with Password, use VNC client to log into it.
The following command will start an x11vnc session in your ssh session or terminal.
x11vnc -usepw
by default it should open port 5900 for VNC
SSH Greeter (Super Optional)
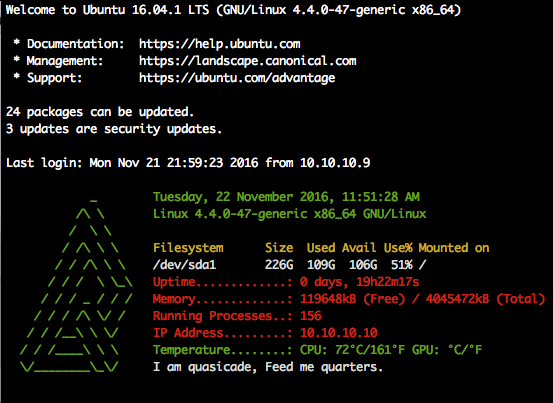
This is completely unnecessary. But I like to see this info when I first log into SSH. When you log into a RetroPie system with the SSH Greeter tweak installed you get this nice ascii art greeting with some quick system facts. I’ve modified it for this install.
At a glance I can see if I have updates, What my filesystem space looks like, How long the machine has been up, Temps etc.
There’s a hidden file in your Lubuntu user’s home directory that you’ll want to paste the code below into.
NOTE: you can seriously screw up your install if you do this wrong, if you’re not comfortable with linux, you might want to skip this step.
Do this from an SSH session or Terminal window: I prefer editing text in VIM so I installed it first (sudo apt-get install vim) but you can use Nano or some other text editor if you prefer.
cp ~/.bashrc ~/.bashrc.backup
sudo vim ~/.bashrc
Next, scroll to the absolute bottom of the file. You’ll want to paste the following code in (Press “I” to enter VIM insert mode first):
# QUASICADE PROFILE START

function quasicade_welcome() {
    local upSeconds="$(/usr/bin/cut -d. -f1 /proc/uptime)"
    local secs=$((upSeconds%60))
    local mins=$((upSeconds/60%60))
    local hours=$((upSeconds/3600%24))
    local days=$((upSeconds/86400))
    local UPTIME=$(printf "%d days, %02dh%02dm%02ds" "$days" "$hours" "$mins" "$secs")

    # calculate rough CPU and GPU temperatures:
    local cpuTempC
    local cpuTempF
    local gpuTempC
    local gpuTempF
    if [[ -f "/sys/class/thermal/thermal_zone0/temp" ]]; then
        cpuTempC=$(($(cat /sys/class/thermal/thermal_zone0/temp)/1000)) && cpuTempF=$((cpuTempC*9/5+32))
    fi

    if [[ -f "/opt/vc/bin/vcgencmd" ]]; then
        if gpuTempC=$(/opt/vc/bin/vcgencmd measure_temp); then
            gpuTempC=${gpuTempC:5:2}
            gpuTempF=$((gpuTempC*9/5+32))
        else
            gpuTempC=""
        fi
    fi

    local df_out=()
    local line
    while read line; do
        df_out+=("$line")
    done < <(df -h /) local rst="$(tput sgr0)" local fgblk="${rst}$(tput setaf 0)" # Black - Regular local fgred="${rst}$(tput setaf 1)" # Red local fggrn="${rst}$(tput setaf 2)" # Green local fgylw="${rst}$(tput setaf 3)" # Yellow local fgblu="${rst}$(tput setaf 4)" # Blue local fgpur="${rst}$(tput setaf 5)" # Purple local fgcyn="${rst}$(tput setaf 6)" # Cyan local fgwht="${rst}$(tput setaf 7)" # White local bld="$(tput bold)" local bfgblk="${bld}$(tput setaf 0)" local bfgred="${bld}$(tput setaf 1)" local bfggrn="${bld}$(tput setaf 2)" local bfgylw="${bld}$(tput setaf 3)" local bfgblu="${bld}$(tput setaf 4)" local bfgpur="${bld}$(tput setaf 5)" local bfgcyn="${bld}$(tput setaf 6)" local bfgwht="${bld}$(tput setaf 7)" local logo=( "${fggrn} _ ${fgrst} " "${fggrn} /\ \ ${fgrst} " "${fggrn} / \ \ ${fgrst} " "${fggrn} / /\ \ \ ${fgrst} " "${fggrn} / / /\ \ \ ${fgrst} " "${fggrn} / / / \ \_\ ${fgrst}" "${fggrn} / / / _ / / / ${fgrst}" "${fggrn} / / / /\ \/ / ${fgrst} " "${fggrn} / / /__\ \ \/ ${fgrst} " "${fggrn}/ / /____\ \ \ ${fgrst} " "${fggrn}\/________\_\/ ${fgrst} " "${fggrn} ${fgrst}" ) local out local i for i in "${!logo[@]}"; do out+=" ${logo[$i]} " case "$i" in 0) out+="${fggrn}$(date +"%A, %e %B %Y, %r")" ;; 1) out+="${fggrn}$(uname -srmo)" ;; 3) out+="${fgylw}${df_out[0]}" ;; 4) out+="${fgwht}${df_out[1]}" ;; 5) out+="${fgred}Uptime.............: ${UPTIME}" ;; 6) out+="${fgred}Memory.............: $(grep MemFree /proc/meminfo | awk {'print $2'})kB (Free) / $(grep MemTotal /proc/meminfo | awk {'print $2'})kB (Total)" ;; 7) out+="${fgred}Running Processes..: $(ps ax | wc -l | tr -d " ")" ;; 8) out+="${fgred}IP Address.........: $(ip route get 8.8.8.8 2>/dev/null | head -1 | cut -d' ' -f8)"
                ;;
            9)
                out+="Temperature........: CPU: $cpuTempC°C/$cpuTempF°F GPU: $gpuTempC°C/$gpuTempF°F"
                ;;
            10)
                out+="${fgwht}I am quasicade, Feed me quarters.${fgrst}"
                ;;
        esac
        out+="\n"
    done
    echo -e "\n$out"
}

quasicade_welcome
# QUASICADE PROFILE END
Press ESC to exit INSERT mode when your modifications are done.
Next type “:wq” to write the file and quit VIM You should see the greeter on the next login.
If you can’t see the CPU temp (and want to) you need to install the ‘lm-sensors’ modules
I will cover my experience, tips, and findings on configuring and tweaking the various aspects of MAME and Front-end on linux in future posts.
You’re probably best to start by thinking about what you want your machine to be.
I’ve decided to refine the quasicade into a gallery of my most favorite machines. While they’re all there, I’ll only be presenting 80 or so in the front-end.
It’s been some time since an update on the Quasicade.
It’s been sitting in the garage lonely. We’ve got family coming for the holidays so I figured I’d bring it out and get it running. Then, I remembered the pain points. It ran windows under all that hyperspin. I’d always lamented that I couldn’t get a flashy front-end on linux.
Enter Attract-mode.
It’s not as feature heavy or as community heavy as Hyperspin. But, it’s not as, heavy.
The layouts are written in Squirrel, it’s pretty hyperspin-theme compatible. All around, it’s great.
This finally allowed me to feel confident I could get a nicely designed front end on linux. So I ripped out the hyperspin drive from the quasicade and tossed it somewhere safe, just in case I wasn’t able to get the open source machine tuned in time. I at least knew I could get the clunky hyperspin install back up again.
Choosing a distro
I wanted something light, without extra fluff if possible, and something that was pretty supported. I didn’t have time or desire to screw around building my own graphics drivers.
I tested #! linux (crunchbang) on my old EEEPC Nintendo emulator, I got RetroPi working on it, but I felt I needed to go 64Bit and something that was still alive and supported. I chose Lubuntu: Lubuntu is a fast and lightweight operating system. The core of the system is based on Linux and Ubuntu. Lubuntu uses the minimal desktop LXDE, and a selection of light applications. We focus on speed and energy-efficiency. Because of this, Lubuntu has very low hardware requirements.
So, How’d it go?
Great, actually. Over the next few posts, I’ll be going into detail on what I did to build and configure MAME 0.179, Attract-Mode, and Lubuntu. Some tricks I learned from the project that you might want in your build, and a few things I stole from the RetroPie project to use on this machine.
The Atari primal rage cabinet featured Atari CAGE: Total Immersion Audio. This meant it had 4″ stereo speakers above the screen and a sub-woofer in the lower cabinet next to the coin doors. This was intended to give games more impact with the extra dynamic sound. That being said, since I was working with an empty cabinet, it did not have a CAGE chip and amplifier, only the speakers.