Want closing your ubuntu linux laptop lid to do nothing for some reason?
Me too. Here’s how:
For the purposes of this document, we’re working with Ubuntu, but should work for most Debian based linux distros.
Edit /etc/systemd/logind.conf
sudo vim /etc/systemd/logind.conf
find or add this line, make sure it’s not commented:
HandleLidSwitch=ignore
save and reboot.
Now, closing the lid will ignore the status of the lid switch, and the laptop will not shut down, or change displays. It’s great for reusing an old laptop headless, or on an external monitor like we do on the Arcade Cabinet.
Sometimes it runs hotter this way, makesure it can breathe!
Want your linux arcade machine to boot right into, and shut down from your attract-mode front end?
Change to OpenBox as your window manager:
log out, select openbox above log in reboot
Add attract mode to autostart with openbox
vim ~/.config/openbox/autostart
paste this:
#AutoStart Attract-Mode
attract
:wq to save and exit vim
Hide the UI even further by changing the default colors to black
sudo vim /usr/lib/x86_64-linux-gnu/openbox-autostart
change the line under # Set a background color from BG=”” to BG=”#000000″
and this line: #test -z $BG || $BG -solid “#303030” to #test -z $BG || $BG -solid “#000000”
Enable shutdown directly from exiting attract-mode:
sudo visudo -f /etc/sudoers
NOTE: this has implications, it basically allows everyone to do super user commands without a password. In the case of my arcade cab, I don’t care. Be aware of the risks.
#!! IMPORTANT: !! – PUT THIS AT THE END OF THE FILE AFTER THE LAST LINE OR YOU WILL RISK BREAKING YOUR ACCESS.
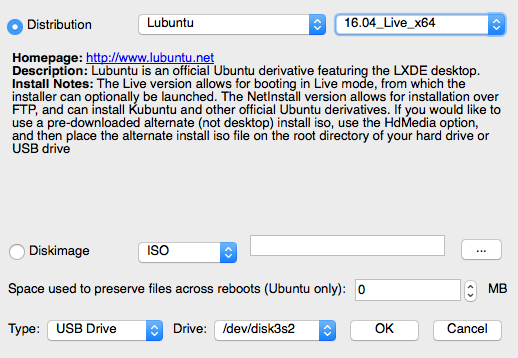
Start UNetbootin (with administrator level permissions if needed).
Select the Lubuntu Distrubution 16.04_live (Select _x64 if you want to install 64 bit mame, which we do in this case.)
Be sure to select the proper USB drive mountpoint above.
If your usb flash disk has been used before, it’s best to format it first.
If you have to format flash media I recommend the official SD formatter at sdcard.org
UNetbootin will load the bootable lubuntu image onto that USB stick and tell you when it’s done.
Step 2: Boot the linux installer and install Lubuntu:
Most semi-ancient machines can boot to USB volumes, but some need a special key or bios setting enabled. On this machine it was pressing f10 at boot time to select a boot device.
I’ll link outward to the official docs for installing lubuntu, they did a great job at explaining it:
note: it’s easiest if you DON’T encrypt homedir, and you tell it to auto-login your user.
The time it takes depends a lot on your hardware and the speed of your flash drive. But it’s not too bad to perform the install.
Step 3: Boot up and install some tweaks and tools: (Technically Optional)
Some of these are just things I did that I find useful for managing the system.
remote SSH access for remote management
VNC for remote-screen access over the network
SSH Greeter (stolen from RetroPie)
Install OpenSSH server for remote management:
Open LXterminal and use these commands to install and configure.
sudo apt update
sudo apt install openssh-server
chkconfig sshd on
ufw allow 22
the “ufw” command allows connections to port 22 through the firewall
You should be able to connect to your lubuntu host from the network, use puTTY on windows or terminal on mac or linux.
A quick way to find your ip address on lubuntu is:
ifconfig |grep -w inet
Then, you can use your remote machine to connect over SSH
ssh user@YOUR_LUBUNTU_HOST
x11VNC to remotely manage system:
Open LXterminal and use these commands to install and configure.
sudo apt install x11vnc
This is probably a machine on your home network, but you should create a password for your user:
x11vnc -usepw
This command will set the password file on it’s first run.
Your user should already be set to auto-login, so you should be able to start x11VNC remotely when you need it. SSH to your machine, Start X11 VNC with Password, use VNC client to log into it.
The following command will start an x11vnc session in your ssh session or terminal.
x11vnc -usepw
by default it should open port 5900 for VNC
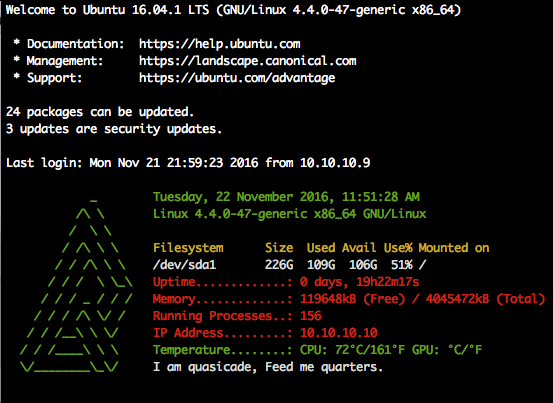
SSH Greeter (Super Optional)
This is completely unnecessary. But I like to see this info when I first log into SSH. When you log into a RetroPie system with the SSH Greeter tweak installed you get this nice ascii art greeting with some quick system facts. I’ve modified it for this install.
At a glance I can see if I have updates, What my filesystem space looks like, How long the machine has been up, Temps etc.
There’s a hidden file in your Lubuntu user’s home directory that you’ll want to paste the code below into.
NOTE: you can seriously screw up your install if you do this wrong, if you’re not comfortable with linux, you might want to skip this step.
Do this from an SSH session or Terminal window: I prefer editing text in VIM so I installed it first (sudo apt-get install vim) but you can use Nano or some other text editor if you prefer.
cp ~/.bashrc ~/.bashrc.backup
sudo vim ~/.bashrc
Next, scroll to the absolute bottom of the file. You’ll want to paste the following code in (Press “I” to enter VIM insert mode first):
# QUASICADE PROFILE START

function quasicade_welcome() {
    local upSeconds="$(/usr/bin/cut -d. -f1 /proc/uptime)"
    local secs=$((upSeconds%60))
    local mins=$((upSeconds/60%60))
    local hours=$((upSeconds/3600%24))
    local days=$((upSeconds/86400))
    local UPTIME=$(printf "%d days, %02dh%02dm%02ds" "$days" "$hours" "$mins" "$secs")

    # calculate rough CPU and GPU temperatures:
    local cpuTempC
    local cpuTempF
    local gpuTempC
    local gpuTempF
    if [[ -f "/sys/class/thermal/thermal_zone0/temp" ]]; then
        cpuTempC=$(($(cat /sys/class/thermal/thermal_zone0/temp)/1000)) && cpuTempF=$((cpuTempC*9/5+32))
    fi

    if [[ -f "/opt/vc/bin/vcgencmd" ]]; then
        if gpuTempC=$(/opt/vc/bin/vcgencmd measure_temp); then
            gpuTempC=${gpuTempC:5:2}
            gpuTempF=$((gpuTempC*9/5+32))
        else
            gpuTempC=""
        fi
    fi

    local df_out=()
    local line
    while read line; do
        df_out+=("$line")
    done < <(df -h /) local rst="$(tput sgr0)" local fgblk="${rst}$(tput setaf 0)" # Black - Regular local fgred="${rst}$(tput setaf 1)" # Red local fggrn="${rst}$(tput setaf 2)" # Green local fgylw="${rst}$(tput setaf 3)" # Yellow local fgblu="${rst}$(tput setaf 4)" # Blue local fgpur="${rst}$(tput setaf 5)" # Purple local fgcyn="${rst}$(tput setaf 6)" # Cyan local fgwht="${rst}$(tput setaf 7)" # White local bld="$(tput bold)" local bfgblk="${bld}$(tput setaf 0)" local bfgred="${bld}$(tput setaf 1)" local bfggrn="${bld}$(tput setaf 2)" local bfgylw="${bld}$(tput setaf 3)" local bfgblu="${bld}$(tput setaf 4)" local bfgpur="${bld}$(tput setaf 5)" local bfgcyn="${bld}$(tput setaf 6)" local bfgwht="${bld}$(tput setaf 7)" local logo=( "${fggrn} _ ${fgrst} " "${fggrn} /\ \ ${fgrst} " "${fggrn} / \ \ ${fgrst} " "${fggrn} / /\ \ \ ${fgrst} " "${fggrn} / / /\ \ \ ${fgrst} " "${fggrn} / / / \ \_\ ${fgrst}" "${fggrn} / / / _ / / / ${fgrst}" "${fggrn} / / / /\ \/ / ${fgrst} " "${fggrn} / / /__\ \ \/ ${fgrst} " "${fggrn}/ / /____\ \ \ ${fgrst} " "${fggrn}\/________\_\/ ${fgrst} " "${fggrn} ${fgrst}" ) local out local i for i in "${!logo[@]}"; do out+=" ${logo[$i]} " case "$i" in 0) out+="${fggrn}$(date +"%A, %e %B %Y, %r")" ;; 1) out+="${fggrn}$(uname -srmo)" ;; 3) out+="${fgylw}${df_out[0]}" ;; 4) out+="${fgwht}${df_out[1]}" ;; 5) out+="${fgred}Uptime.............: ${UPTIME}" ;; 6) out+="${fgred}Memory.............: $(grep MemFree /proc/meminfo | awk {'print $2'})kB (Free) / $(grep MemTotal /proc/meminfo | awk {'print $2'})kB (Total)" ;; 7) out+="${fgred}Running Processes..: $(ps ax | wc -l | tr -d " ")" ;; 8) out+="${fgred}IP Address.........: $(ip route get 8.8.8.8 2>/dev/null | head -1 | cut -d' ' -f8)"
                ;;
            9)
                out+="Temperature........: CPU: $cpuTempC°C/$cpuTempF°F GPU: $gpuTempC°C/$gpuTempF°F"
                ;;
            10)
                out+="${fgwht}I am quasicade, Feed me quarters.${fgrst}"
                ;;
        esac
        out+="\n"
    done
    echo -e "\n$out"
}

quasicade_welcome
# QUASICADE PROFILE END
Press ESC to exit INSERT mode when your modifications are done.
Next type “:wq” to write the file and quit VIM You should see the greeter on the next login.
If you can’t see the CPU temp (and want to) you need to install the ‘lm-sensors’ modules
I will cover my experience, tips, and findings on configuring and tweaking the various aspects of MAME and Front-end on linux in future posts.
You’re probably best to start by thinking about what you want your machine to be.
I’ve decided to refine the quasicade into a gallery of my most favorite machines. While they’re all there, I’ll only be presenting 80 or so in the front-end.
I have a client who has a large web presence that’s uniformly IIS and windows hosts. They have a wildcard SSL cert that covers all servers and subdomains under their main domain.
In an effort to configure a standalone LAMP server under that wildcard, had it’s own small challenge.
To enable a wildcard SSL cert on a server (at least in this example) you’ll need:
The private key from the server that generated the Certificate Request (.csr)
The CA-Bundle or chain from the certificate authority
The Wildcard SSL certificate.
In this case, the client was running windows servers so the whole lot was wrapped in a PKCS12 archive.
From Wikipedia:
In cryptography, PKCS #12 defines an archive file format for storing many cryptography objects as a single file. It is commonly used to bundle a private key with its X.509certificate or to bundle all the members of a chain of trust.
A PKCS #12 file may be encrypted and signed. The internal storage containers, called “SafeBags”, may also be encrypted and signed. A few SafeBags are predefined to store certificates, private keys and CRLs. Another SafeBag is provided to store any other data at individual implementer’s choice.
PKCS #12 is one of the family of standards called Public-Key Cryptography Standards (PKCS) published by RSA Laboratories.
The filename extension for PKCS #12 files is “.p12” or “.pfx”.
These files can be created, parsed and read out with the OpenSSL pkcs12 command.
OK, so I have the PFX file provided by the client with the keys inside. Here’s the process for extracting and configuring apache to accept them.
In this instance I’m running a bitnami wordpress stack on Amazon EC2 so the paths in config files reflect that and may need altered for your particular installation.
Step 1: You copy the pfx file to the machine to be secured.
In this case I just used SFTP to put the file in place in my apache config folder. (/opt/bitnami/apache2/conf)
NOTE: If you want to force this site to be SSL all the time, which I’m doing in this case. Look for the <VirtualHost _default_:80> section to force the redirect.
Paste the following block under the DocumentRoot line:
  RewriteEngine On
  RewriteCond %{HTTPS} !=on
  RewriteRule ^/(.*) https://%{SERVER_NAME}/$1 [R,L]
Here’s what the full <VirtualHost _default_:80> section looks like on my server:
DocumentRoot "/opt/bitnami/apache2/htdocs"
  RewriteEngine On
  RewriteCond %{HTTPS} !=on
  RewriteRule ^/(.*) https://%{SERVER_NAME}/$1 [R,L]
  <directory "="" opt="" bitnami="" apache2="" htdocs"="">
    Options FollowSymLinks MultiViews
    AddLanguage en en
    AddLanguage es es
    AddLanguage pt-BR pt-br
    AddLanguage zh zh
    AddLanguage ko ko
    AddLanguage he he
    AddLanguage de de
    AddLanguage ro ro
    AddLanguage ru ru
    LanguagePriority en
    ForceLanguagePriority Prefer Fallback

    AllowOverride All

      Order allow,deny
      Allow from all

    = 2.3 >
      Require all granted

  # Error Documents
  ErrorDocument 503 /503.html

  # Bitnami applications installed with a prefix URL (default)
  Include "/opt/bitnami/apache2/conf/bitnami/bitnami-apps-prefix.conf"
Next we’ll locate the <VirtualHost _default_:443> configuration section.
You should see something of this sort by default:
  DocumentRoot "/opt/bitnami/apache2/htdocs"
  SSLEngine on
  SSLCertificateFile "/opt/bitnami/apache2/conf/server.crt"
  SSLCertificateKeyFile "/opt/bitnami/apache2/conf/server.key"
We need to specify the proper certificate, key and bundle locations here. I’ve commented out the defaults and added the required sections above.
One of the major pains of shared hosting migration is user email on the system. This process enables a fairly easy method of migration using an application on the command line of a CentOS server (or any other linux host) as an intermediary.
[hr top=”0″ bottom=”18″ /]
Log into the server you wish to be the migrator:
ssh user@YOURLINUXBOX.FQDN.COM
Next we must install imapsync, the next two commands are dependent on your architecture, choose one:
RHEL based distro:
sudo yum -y install imapsync
Debian based distro:
sudo apt-get -y install imapsync
It will install the perl dependencies and the imapsync CLI application.
[hr top=”0″ bottom=”18″ /]
Next we’ll issue the sync commands.
Here are some of the options you can use (from the manpage):
[hr top=”0″ bottom=”18″ /]
usage: /usr/bin/imapsync [options]

Several options are mandatory.

--dry                  : Makes imapsync doing nothing, just print what would
                         be done without --dry.

--host1        : Source or "from" imap server. Mandatory.
--port1           : Port to connect on host1. Default is 143, 993 if --ssl1
--user1        : User to login on host1. Mandatory.
--showpasswords        : Shows passwords on output instead of "MASKED".
                         Useful to restart a complete run by just reading the log.
--password1    : Password for the user1.
--host2        : "destination" imap server. Mandatory.
--port2           : Port to connect on host2. Default is 143, 993 if --ssl2
--user2        : User to login on host2. Mandatory.
--password2    : Password for the user2.

--passfile1    : Password file for the user1. It must contain the
                         password on the first line. This option avoids to show
                         the password on the command line like --password1 does.
--passfile2    : Password file for the user2. Contains the password.

--ssl1                 : Use a SSL connection on host1.
--ssl2                 : Use a SSL connection on host2.
--tls1                 : Use a TLS connection on host1.
--tls2                 : Use a TLS connection on host2.
--timeout         : Connections timeout in seconds. Default is 120.
                         0 means no timeout.

--authmech1    : Auth mechanism to use with host1:
                         PLAIN, LOGIN, CRAM-MD5 etc. Use UPPERCASE.
--authmech2    : Auth mechanism to use with host2. See --authmech1

--authuser1    : User to auth with on host1 (admin user).
                         Avoid using --authmech1 SOMETHING with --authuser1.
--authuser2    : User to auth with on host2 (admin user).
--proxyauth1           : Use proxyauth on host1. Requires --authuser1.
                         Required by Sun/iPlanet/Netscape IMAP servers to
                         be able to use an administrative user.
--proxyauth2           : Use proxyauth on host2. Requires --authuser2.

--authmd51             : Use MD5 authentification for host1.
--authmd52             : Use MD5 authentification for host2.
--domain1      : Domain on host1 (NTLM authentication).
--domain2      : Domain on host2 (NTLM authentication).


--folder       : Sync this folder.
--folder       : and this one, etc.
--folderrec    : Sync this folder recursively.
--folderrec    : and this one, etc.

--folderfirst  : Sync this folder first. --folderfirst "Work"
--folderfirst  : then this one, etc.
--folderlast   : Sync this folder last. --folderlast "[Gmail]/All Mail"
--folderlast   : then this one, etc.

--nomixfolders         : Do not merge folders when host1 is case sensitive
                         while host2 is not (like Exchange). Only the first
                         similar folder is synced (ex: Sent SENT sent -> Sent).

--skipemptyfolders     : Empty host1 folders are not created on host2.

--include       : Sync folders matching this regular expression
--include       : or this one, etc.
                         in case both --include --exclude options are
                         use, include is done before.
--exclude       : Skips folders matching this regular expression
                         Several folders to avoid:
			  --exclude 'fold1|fold2|f3' skips fold1, fold2 and f3.
--exclude       : or this one, etc.

--regextrans2   : Apply the whole regex to each destination folders.
--regextrans2   : and this one. etc.
                         When you play with the --regextrans2 option, first
                         add also the safe options --dry --justfolders
                         Then, when happy, remove --dry, remove --justfolders.
                         Have in mind that --regextrans2 is applied after prefix
                         and separator inversion.

--tmpdir       : Where to store temporary files and subdirectories.
                         Will be created if it doesn't exist.
			 Default is system specific, Unix is /tmp but
                         it's often small and deleted at reboot.
                         --tmpdir /var/tmp should be better.
--pidfile      : The file where imapsync pid is written.
--pidfilelocking       : Abort if pidfile already exists. Usefull to avoid
                         concurrent transfers on the same mailbox.

--nolog                : Turn off logging on file
--logfile      : Change the default logfile pathname and filename.

--prefix1      : Remove prefix to all destination folders
                         (usually INBOX. or INBOX/ or an empty string "")
                         you have to use --prefix1 if host1 imap server
                         does not have NAMESPACE capability, all other
                         cases are bad.
--prefix2      : Add prefix to all host2 folders. See --prefix1
--sep1         : Host1 separator in case NAMESPACE is not supported.
--sep2         : Host2 separator in case NAMESPACE is not supported.

--skipmess      : Skips messages maching the regex.
                         Example: 'm/[\x80-ff]/' # to avoid 8bits messages.
                         --skipmess is applied before --regexmess
--skipmess      : or this one, etc.

--disarmreadreceipts   : Disarms read receipts (host2 Exchange issue)

--regexmess     : Apply the whole regex to each message before transfer.
                         Example: 's/\000/ /g' # to replace null by space.
--regexmess     : and this one, etc.

--regexflag     : Apply the whole regex to each flags list.
                         Example: 's/"Junk"//g' # to remove "Junk" flag.
--regexflag     : and this one, etc.

--delete               : Deletes messages on host1 server after a successful
                         transfer. Option --delete has the following behavior:
                         it marks messages as deleted with the IMAP flag
                         \Deleted, then messages are really deleted with an
                         EXPUNGE IMAP command.

--delete2              : Delete messages in host2 that are not in
                         host1 server. Useful for backup or pre-sync.
--delete2duplicates    : Delete messages in host2 that are duplicates.
                         Works only without --useuid since duplicates are
                         detected with an header part of each message.

--delete2folders       : Delete folders in host2 that are not in host1 server.
                         For safety, first try it like this (it is safe):
			 --delete2folders --dry --justfolders --nofoldersizes
--delete2foldersonly   : Deleted only folders matching regex.
                         Example: --delete2foldersonly "/^Junk$|^INBOX.Junk$/"
--delete2foldersbutnot : Do not delete folders matching regex.
                         Example: --delete2foldersbutnot "/Tasks$|Contacts$|Foo$/"
--noexpunge            : Do not expunge messages on host1.
                         Expunge really deletes messages marked deleted.
                         Expunge is made at the beginning, on host1 only.
                         Newly transferred messages are also expunged if
			 option --delete is given.
                         No expunge is done on host2 account (unless --expunge2)
--expunge1             : Expunge messages on host1 after messages transfer.
--expunge2             : Expunge messages on host2 after messages transfer.
--uidexpunge2          : uidexpunge messages on the host2 account
                         that are not on the host1 account, requires --delete2
--nomixfolders         : Avoid merging folders that are considered different on
                         host1 but the same on destination host2 because of
                         case sensitivities and insensitivities.

--syncinternaldates    : Sets the internal dates on host2 same as host1.
                         Turned on by default. Internal date is the date
			 a message arrived on a host (mtime).
--idatefromheader      : Sets the internal dates on host2 same as the
                         "Date:" headers.

--maxsize         : Skip messages larger  (or equal) than  bytes
--minsize         : Skip messages smaller (or equal) than  bytes
--maxage          : Skip messages older than  days.
                         final stats (skipped) don't count older messages
			 see also --minage
--minage          : Skip messages newer than  days.
                         final stats (skipped) don't count newer messages
                         You can do (+ are the messages selected):
                         past|----maxage+++++++++++++++>now
                         past|+++++++++++++++minage---->now
                         past|----maxage+++++minage---->now (intersection)
                         past|++++minage-----maxage++++>now (union)

--search       : Selects only messages returned by this IMAP SEARCH
                         command. Applied on both sides.
--search1      : Same as --search for selecting host1 messages only.
--search2      : Same as --search for selecting host2 messages only.
                         --search CRIT equals --search1 CRIT --search2 CRIT

--exitwhenover    : Stop syncing when total bytes transferred reached.
                         Gmail per day allows 2500000000 down 500000000 upload.

--maxlinelength   : skip messages with a line length longer than  bytes.
                         RFC 2822 says it must be no more than 1000 bytes.

--useheader    : Use this header to compare messages on both sides.
                         Ex: Message-ID or Subject or Date.
--useheader      and this one, etc.

--subscribed           : Transfers subscribed folders.
--subscribe            : Subscribe to the folders transferred on the
                         host2 that are subscribed on host1. On by default.
--subscribeall         : Subscribe to the folders transferred on the
                         host2 even if they are not subscribed on host1.

--nofoldersizes        : Do not calculate the size of each folder in bytes
                         and message counts. Default is to calculate them.
--nofoldersizesatend   : Do not calculate the size of each folder in bytes
                         and message counts at the end. Default is on.
--justfoldersizes      : Exit after having printed the folder sizes.

--syncacls             : Synchronises acls (Access Control Lists).
--nosyncacls           : Does not synchronize acls. This is the default.
                         Acls in IMAP are not standardized, be careful.

--usecache             : Use cache to speedup.
--nousecache           : Do not use cache. Caveat: --useuid --nousecache creates
                         duplicates on multiple runs.
--useuid               : Use uid instead of header as a criterium to recognize
                         messages. Option --usecache is then implied unless
                         --nousecache is used.

--debug                : Debug mode.
--debugcontent         : Debug content of the messages transfered.
--debugflags           : Debug flags.
--debugimap1           : IMAP debug mode for host1. imap debug is very verbose.
--debugimap2           : IMAP debug mode for host2.
--debugimap            : IMAP debug mode for host1 and host2.

--tests                : Run non-regression tests.
--testslive            : Run a live test with test1.lamiral.info imap server.
                         Useful to check the basics. Needs internet connexion.

--version              : Print software version.
--noreleasecheck       : Do not check for new imapsync release (a http request).
--releasecheck         : Check for new imapsync release (a http request).
--justconnect          : Just connect to both servers and print useful
                         information. Need only --host1 and --host2 options.
--justlogin            : Just login to both host1 and host2 with users
                         credentials, then exit.
--justfolders          : Do only things about folders (ignore messages).

--help                 : print this help.

Example: to synchronize imap account "test1" on "test1.lamiral.info"
                    to  imap account "test2" on "test2.lamiral.info"
                    with test1 password "secret1"
                    and  test2 password "secret2"

/usr/bin/imapsync \
   --host1 test1.lamiral.info --user1 test1 --password1 secret1 \
   --host2 test2.lamiral.info --user2 test2 --password2 secret2
[hr top=”0″ bottom=”18″ /]
OK, thats a lot of options. For this situation let’s assume we’re migrating from one shared hosting to another (e.g. bluehost->inmotionhosting)
You should create the account you wish to sync on the target host. Use your cpanel to create the same user and password at the target.
In this example that’s USERNAME@DOMAIN.COM with the password ‘PASSWORD’.
Find out what your shared host uses for IMAP connections. Also make note whether they offer Secure IMAP (over SSL or TLS) you’ll need that info for the next command.
Once you’ve created the target account and imapsync is installed on the intermediary server you can dry-run sync the imap trees with one command:
–drycreates a dry run, this performs a non-destructive test, if you see the output you’re looking for you can continue. Otherwise it protects you from a bad sync.
–ssl2says that the new host (host2) is using ssl, you can specify the same flag for host1 by adding –ssl1
–host1 YOURIMAP.bluehost.com specifies the name of the host that holds the mailbox to be migrated. Verify whether or not you need ssl/tls for this connection.
–user1 USERNAME@DOMAIN.com this will be the username to log in to host1’s email box
–password1 ‘PASSWORD’you should add the single quotes especially if there are special characters in the password.
–host2 YOURSECUREIMAP.inmotionhosting.comsets the second host, or the target of the migration. also, verify ssl/tls and specify in the initial flags if needed.
–user2 USERNAME@DOMAIN.com this in most cases will be the exact same username and password, but created on the new host (host2)
–password2 ‘PASSWORD’ the password for the target account on host2
Update that command string with the required flags and info, and run it. You should see output like this:
[hr top=”0″ bottom=”18″ /]
imapsync --dry --ssl2 --host1 YOURIMAP.bluehost.com --user1 USER@DOMAIN.com --password1 'PASSWORD' --host2 YOURSECUREIMAP.inmotionhosting.com --user2 USER@DOMAIN.com --password2 'PASSWORD'
Transfer started at Wed Nov  4 08:27:10 2015
PID is 24597
Log file is LOG_imapsync/2015_11_04_08_27_10_USER@DOMAIN.com.txt  ( to change it, use --logfile filepath ; or use --nolog to turn off logging )
$RCSfile: imapsync,v $ $Revision: 1.637 $ $Date: 2015/04/01 01:36:37 $
Here is a [linux] system (Linux YOURLINUXBOX.FQDN.com 2.6.32-573.7.1.el6.x86_64 #1 SMP Tue Sep 22 22:00:00 UTC 2015 x86_64)
With perl 5.10.1 Mail::IMAPClient  3.34
Command line used:
/usr/bin/imapsync --dry --ssl2 --host1 YOURIMAP.bluehost.com --user1 USER@DOMAIN.com --password1 MASKED --host2 YOURSECUREIMAP.inmotionhosting.com --user2 USER@DOMAIN.com --password2 MASKED
Temp directory is /tmp  ( to change it use --tmpdir dirpath )
PID file is /tmp/imapsync.pid ( to change it use --pidfile filepath ; to avoid it use --pidfile "" )
Modules version list:
Mail::IMAPClient     3.34
IO::Socket           1.31
IO::Socket::IP       ?
IO::Socket::INET     1.31
IO::Socket::SSL      1.31
Net::SSLeay          1.35
Compress::Zlib       2.021
Digest::MD5          2.39
Digest::HMAC_MD5     1.01
Digest::HMAC_SHA1    1.01
Term::ReadKey        2.30
File::Spec           3.3
Time::HiRes          1.9721
Unicode::String      2.09
IO::Tee              0.64
File::Copy::Recursive 0.38
Authen::NTLM         1.09
URI::Escape          3.29
Data::Uniqid         0.12
( use --no-modules_version to turn off printing this Perl modules list )
Info: turned ON syncinternaldates, will set the internal dates (arrival dates) on host2 same as host1.
Info: will try to use LOGIN authentication on host1
Info: will try to use LOGIN authentication on host2
Info: imap connexions timeout is 120 seconds
Host1: IMAP server [YOURIMAP.bluehost.com] port [143] user [USER@DOMAIN.com]
Host2: IMAP server [YOURSECUREIMAP.inmotionhosting.com] port [993] user [USER@DOMAIN.com]
Host1: * OK [CAPABILITY IMAP4rev1 LITERAL+ SASL-IR LOGIN-REFERRALS ID ENABLE IDLE STARTTLS AUTH=PLAIN AUTH=LOGIN] Dovecot ready.
Host1: YOURIMAP.bluehost.com says it has CAPABILITY for AUTHENTICATE LOGIN
Host1: success login on [YOURIMAP.bluehost.com] with user [USER@DOMAIN.com] auth [LOGIN]
Host2: * OK [CAPABILITY IMAP4rev1 UIDPLUS CHILDREN NAMESPACE THREAD=ORDEREDSUBJECT THREAD=REFERENCES SORT QUOTA IDLE AUTH=PLAIN ACL ACL2=UNION] Courier-IMAP ready. Copyright 1998-2011 Double Precision, Inc.  See COPYING for distribution information.
Host2: YOURSECUREIMAP.inmotionhosting.com says it has NO CAPABILITY for AUTHENTICATE LOGIN
Host2: success login on [YOURSECUREIMAP.inmotionhosting.com] with user [USER@DOMAIN.com] auth [LOGIN]
Host1: state Authenticated
Host2: state Authenticated
Host1 capability: IMAP4rev1 LITERAL+ SASL-IR LOGIN-REFERRALS ID ENABLE IDLE SORT SORT=DISPLAY THREAD=REFERENCES THREAD=REFS THREAD=ORDEREDSUBJECT MULTIAPPEND URL-PARTIAL CATENATE UNSELECT CHILDREN NAMESPACE UIDPLUS LIST-EXTENDED I18NLEVEL=1 CONDSTORE QRESYNC ESEARCH ESORT SEARCHRES WITHIN CONTEXT=SEARCH LIST-STATUS SPECIAL-USE BINARY MOVE QUOTA
Host2 capability: IMAP4rev1 UIDPLUS CHILDREN NAMESPACE THREAD=ORDEREDSUBJECT THREAD=REFERENCES SORT QUOTA IDLE AUTH=PLAIN ACL ACL2=UNION
Host1: separator given by NAMESPACE: [.]
Host2: separator given by NAMESPACE: [.]
Host1: prefix given by NAMESPACE: [INBOX.]
Host2: prefix given by NAMESPACE: [INBOX.]
Host1 separator and prefix: [.][INBOX.]
Host2 separator and prefix: [.][INBOX.]

++++ Listing folders
All foldernames are presented between brackets like [X] where X is the foldername.
When a foldername contains non-ASCII characters it is presented in the form
[X] = [Y] where
X is the imap foldername you have to use in command line options and
Y is the uft8 output just printed for convenience, to recognize it.

Host1 folders list:
[INBOX]
[INBOX.Drafts]
[INBOX.Junk]
[INBOX.Sent]
[INBOX.Trash]

Host2 folders list:
[INBOX]
[INBOX.Drafts]
[INBOX.Junk]
[INBOX.Sent]
[INBOX.Trash]


Folders sizes before the synchronization.
You can remove foldersizes listings by using "--nofoldersizes" and  "--nofoldersizesatend"
but then you will also loose the ETA (Estimation Time of Arrival) given after each message copy.
++++ Calculating sizes on Host1
Host1 folder [INBOX]                             Size: 538025884 Messages:  8023 Biggest:  30508221
Host1 folder [INBOX.Drafts]                      Size:         0 Messages:     0 Biggest:         0
Host1 folder [INBOX.Junk]                        Size:      3748 Messages:     1 Biggest:      3748
Host1 folder [INBOX.Sent]                        Size: 108469842 Messages:   170 Biggest:  30507437
Host1 folder [INBOX.Trash]                       Size:     87568 Messages:     8 Biggest:     30073
Host1 Nb messages:            8202 messages
Host1 Total size:        646587042 bytes (616.633 MiB)
Host1 Biggest message:    30508221 bytes (29.095 MiB)
Host1 Time spent:              4.3 seconds
++++ Calculating sizes on Host2
Host2 folder [INBOX]                             Size:         0 Messages:     0 Biggest:         0
Host2 folder [INBOX.Drafts]                      Size:         0 Messages:     0 Biggest:         0
Host2 folder [INBOX.Junk]                        Size:         0 Messages:     0 Biggest:         0
Host2 folder [INBOX.Sent]                        Size:         0 Messages:     0 Biggest:         0
Host2 folder [INBOX.Trash]                       Size:         0 Messages:     0 Biggest:         0
Host2 Nb messages:               0 messages
Host2 Total size:                0 bytes (0.000 KiB)
Host2 Biggest message:           0 bytes (0.000 KiB)
Host2 Time spent:              0.1 seconds
++++ Looping on each folder
[INBOX]                             -> [INBOX]
Subscribing to folder INBOX on destination server
msg INBOX/1 copying to INBOX 	(not really since --dry mode)
msg INBOX/2 copying to INBOX 	(not really since --dry mode)
msg INBOX/3 copying to INBOX 	(not really since --dry mode)
msg INBOX/4 copying to INBOX 	(not really since --dry mode)

### TRUNCATED HERE ###
Towards the end there, you see it starts copying messages, but it’s simulated because of dry run.
If you feel the output matches your desired outcome, you can stop the process with CTRL+C and remove –dry from the command to begin sync.
Once the sync has completed, verify the new account by logging into webmail. If everything looks good, you can change your DNS settings to point to the new server.
Because of propagation, be sure to monitor the old account for a few days before deleting it, some mail services may cache the DNS lookup and deliver to the old box. This is unfortunately unavoidable.
Run the installer as an administrator in windows. Once the installer completes, you must locate and edit the configuration files:
You can usually find these in windows by clicking Start -> All Programs -> Bacula -> Configuration -> Edit *SOMETHING* Configuration.
We’ll stick to Client Configuration for this guide.
It opens in a text editor. Here are the relevant sections to edit:
#
# "Global" File daemon configuration specifications
#
FileDaemon {                            # this is me
  Name = SERVERNAME-fd
  FDport = 9102                # where we listen for the director
  WorkingDirectory = "C:\\Program Files\\Bacula\\working"
  Pid Directory = "C:\\Program Files\\Bacula\\working"
# Plugin Directory = "C:\\Program Files\\Bacula\\plugins"
  Maximum Concurrent Jobs = 10
}
Under the FileDaemon section, edit your global name field to match whatever is expected in the Director configuration.
[hr top=”0″ bottom=”18″ /]
Next we need to set the director name and password:
#
# List Directors who are permitted to contact this File daemon
#
Director {
  Name = bacula-dir
  Password = "XxXXxxXXxxxxxXXXxxxxXX"
}
Note, the name of bacula-dir is the default. Make sure it matches the main server director’s name.
The password field can be unique to this FD client, but must match in the main bacula director configuration file.
Save these files to the local machine, restart the bacula FD service.
[hr top=”0″ bottom=”18″ /]
Add the new FileDaemon to Bacula Director
ssh root@BACULA.YOURDOMAIN.com
Then, super-user edit the bacula-dir.conf file:
sudo nano /etc/bacula/bacula-dir.conf
Next we’ll locate the client config section and edit as follows:
Find a record to duplicate and copy/paste it to make your modifications.
# SERVERNAME Server
Client {
  Name = SERVERNAME-fd
  Address = SERVERNAME.YOURDOMAIN.com
  FDPort = 9102
  Catalog = MyCatalog
  Password = "XxXXxxXXxxxxxXXXxxxxXX"	 # password for FileDaemon
  File Retention = 7 days            # one week
  Job Retention = 7 days           # one week
  AutoPrune = no                    # Prune expired Jobs/Files
}
Edit the comment to match your server name.
Edit the Name field to match your FD’s name.
Edit the address to the IP or FQDN of the server you wish to add.
Verify that the password matches exactly.
Save changes to bacula-dir.conf and restart the director:
There are a few notable sections we must edit to add a new target:
Job definition
File Set
Client File Services (if not already added to the director)
[hr top=”0″ bottom=”18″ /]
The Job definition record is typically as follows, you can usually duplicate and modify:
#Backup SOMETHING on SERVERNAME
Job {
Name = "Backup SOMETHING share"
JobDefs = DefaultJob
Type = Backup
Level = Incremental
Client = servername-fd
FileSet = "SERVERNAME-SOMETHING"
Schedule = "WeeklyCycle"
Storage = Storage01
Pool = BaculaPool
}
Replace SOMETHING with a description of what you’re backing up.
That could be the name of a share (e.g. Clients).
Adjust the Name field for the friendly name of the backup job.
Edit the Client field to match the exact name of the bacula FileDaemon for a given server (See Adding a new FileDaemon).
Edit the FileSet name to exactly match the name specified in the FileSet directive later in the configuration file.
Edit the Storage field according to which storage pool you’d like. Be careful not to over-fill a pool with backups
Options in this example:
Storage01 = /iscsi/storage01/*
Storage02 = /iscsi/storage02/*
Storage03 = /iscsi/storage03/*
Match the Pool reference to the appropriate storage recycle pool to the storage you chose:
Storage01 = BaculaPool
Storage02 = BaculaPool2
Storage03 = BaculaPool3
[hr top=”0″ bottom=”18″ /]
Locate the file set closest to the config you duplicated for backup job. Please note, these are different depending on backup of Linux/unix or Windows based file formats:
Windows FileSet:
#SERVERNAME SOMETHING Backup Set
FileSet {
 Name = "SERVERNAME-SOMETHING"
 Include {
  Options {
   signature = MD5
   Exclude = yes
   IgnoreCase = yes
   # Exclude Mozilla-based programs' file caches
   WildDir = "[A-Z]:/Documents and Settings/*/Application Data/*/Profiles/*/*/Cache"
   WildDir = "[A-Z]:/Documents and Settings/*/Application Data/*/Profiles/*/*/Cache.Trash"
   WildDir = "[A-Z]:/Documents and Settings/*/Application Data/*/Profiles/*/*/ImapMail"

   # Exclude user's registry files - they're always in use anyway.
   WildFile = "[A-Z]:/Documents and Settings/*/Local Settings/Application Data/Microsoft/Windows/usrclass.*"
   WildFile = "[A-Z]:/Documents and Settings/*/ntuser.*"

   # Exclude directories full of lots and lots of useless little files
   WildDir = "[A-Z]:/Documents and Settings/*/Cookies"
   WildDir = "[A-Z]:/Documents and Settings/*/Recent"
   WildDir = "[A-Z]:/Documents and Settings/*/Local Settings/History"
   WildDir = "[A-Z]:/Documents and Settings/*/Local Settings/Temp"
   WildDir = "[A-Z]:/Documents and Settings/*/Local Settings/Temporary Internet Files"

   # These are always open and unable to be backed up


   # Some random bits of Windows we want to ignore

   # Temporary directories & files
   WildDir = "[A-Z]:/WINNT/Temp"
   WildDir = "[A-Z]:/temp"
   WildFile = "*.tmp"
   WildDir = "[A-Z]:/tmp"
   WildDir = "[A-Z]:/var/tmp"

   # Recycle bins
   WildDir = "[A-Z]:/RECYCLER"

   # Swap files


   # These are programs and are easier to reinstall than restore from
   # backup
   }

   #these are the files to back up

   File = "D:/SOMETHING/PATH"
   File = "E:/SOMETHINGELSE/PATH"
 }

}
Edit the comment to match your server and job info
Edit the Name field to match exactly what you specified in the JobDefs
Edit the File field at the bottom accordingly.
You can specify more than one File path (recursive by default)
NOTE: because this is running on a Linux system you must use / (forward slash) for it to understand slashes.
You can use spaces in the path as long as the (required) quotes remain intact
For Linux paths, use a root relative path e.g. /SOMETHING/PATH
If the phrase “green thumb” is meant to invoke the healthy color of the plants you care for: mine’s often more dry, yellowish, with brown edges.
I love having plants around me, but I’m a pretty busy guy. Like many of us, I have trouble remembering what day it is, let alone whether it’s rained enough or the soil chemistry is right for my garden.
This review wouldn’t be on this page if it wasn’t somehow involving crazy technology, right?
[hr top=”0″ bottom=”18″ /]
Enter: The Parrot Flower Power.
Here’s the short version for those without patience:
[hr top=”0″ bottom=”18″ /]
Good:
Cool device, great battery, easy setup, helpful reminders.
Bad:
Still have to be in bluetooth range to check reports.
Overall Verdict:
The device is intuitive and helpful, but isn’t a magic bullet if you’re already terrible at paying attention.
[hr top=”0″ bottom=”18″ /]
The Flower Power is essentially a small (about 8 inches tall) Bluetooth 4.0 enabled sensor array shaped like a stick, or a sprouting plant. It’s waterproof, indoor/outdoor, and a single AAA battery lasts for at least 6 months.You can press the sharp end into the ground (or pot) set up the Flower Power on your iPhone or Android device. The app is free and is fairly easy to get up and running. Whenever you’re in range of the Flower Power, you can poll it for its readings. The internal memory can hold many days worth of scans, so don’t worry about missing a day… you have to tend to your plants daily anyhow, right?
The main parts of the flower power are the sunlight sensor on the top of the stick, as well as moisture sensors in the stake. There are thermistors in the top for checking surrounding air temperature and in the bottom for checking soil temperature. The Flower Power uses soil electrical conductivity measurements to detect the amount of ions in the soil (More ions, more fertilizer).
[hr top=”0″ bottom=”18″ /]
Set Up and Grow
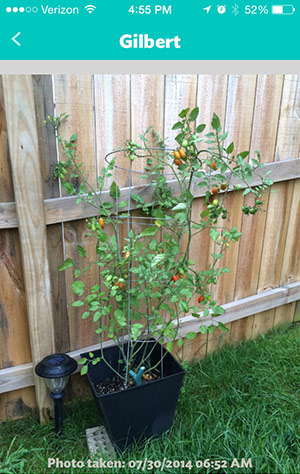
I had a tomato plant growing in a large pot in my yard. It’s a Grape Tomato. That’s all I know about it. Well, that and it wasn’t doing very well.
My buddies at VerizonWireless hooked me up with this Flower Power device and I thought I’d give it a go.
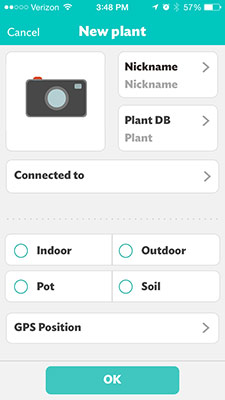
Set up was fairly easy, Twist the cap on the sprout, insert one AAA battery, replace the cap. Next I had to download the application on my iPhone.
I followed the easy account creation and setup instructions and paired the device to my phone.
Next, it was time to add the plant.
Easy enough, I selected the details, and chose which Flower Power was monitoring it, apparently you can use several at once.
[hr top=”0″ bottom=”18″ /]
What’chu know ’bout tomatoes?
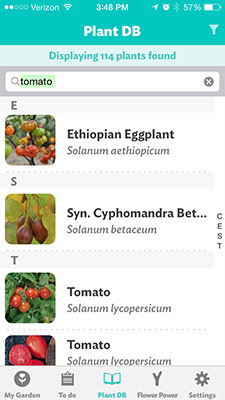
Apparently I didn’t know enough. I knew this was a “grape tomato” from the tag that came with the seedling. However I was lucky that I already had one with fruit on it, I could use the pictures of the hundreds of tomato plants to try to identify it. If you don’t already know the specific scientific name or species (who does, right?) it could be very difficult to find your plant in the database.
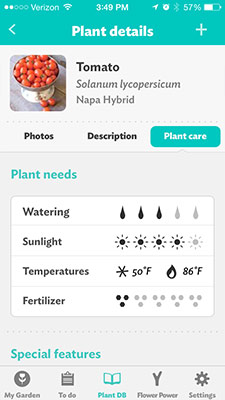
We’ll go with Napa Hybrid and try our best.
The plant care details page gave me a general idea of what to expect. It needed to live in significant sunlight, and didn’t need over-fertilized.
The app had me name the plant, and take a picture.
Once it’s fully set up in the app, you’ll see it appear in “My Garden”.
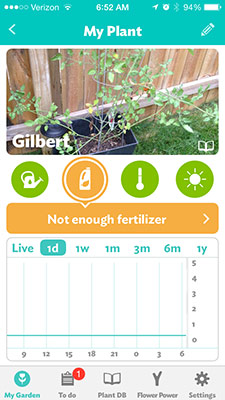
It takes about 24 hours to get a first report on your plant, but you can immediately pull some information from the live feed.
At this point, Gilbert was moderately sad, his leaves were yellowish with brown edges, and his stems were flimsy.
Lets give him some time.
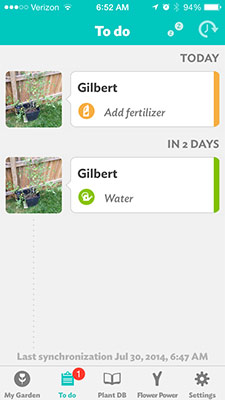
The plant was outside my back door in the yard, so I’d just make it a point to go out every morning and evening when I’m letting my dogs outside to open the app and re-sync the Flower Power to the app.
Occasionally I’d get messages from Gilbert that he needed something.
While you still have to actively pay attention to the plants, this helps remind you what it needs and when. If you’re someone who forgets about plants and they constantly die, this app will only help you if you similarly remember to go and pull reports from the sensor.
I followed my Flower Power recommendations, it was quite easy.
[hr top=”0″ bottom=”18″ /]
What if I really like graphs and charts?
If you’d like some larger graphs and a big view of the data, you can use the Flower Power’s cloud site.
Here you can see your garden and select the plants on which data you’d like to drill down.
[hr top=”0″ bottom=”18″ /]
Ok, we’re dying to know, did this magical robot stick help your plant?
So, my official opinion is that I like the device. I think it provides interesting information on the health of your plants. However, it’s not a silver bullet. You still need to remember to go check the readings, and then act accordingly.
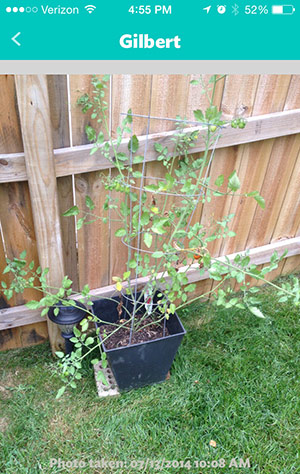
Let’s see how gilbert feels, these photos are a little over two weeks apart.
On the left, the initial photo, he’s yellow and chalky. On the right, he’s darker green, and has more fruit.
I’d say just having the device to remind me he was there helped me care for him.
If you’d like one for yourself or a friend with a less-than-green thumb and an affinity for tech. You can find the device here:
Hey! It’s summer here, time for vacations and sun.
Anyone who knows me, realizes that I’ve got music in my ears just about every moment I’m able. The folks over at VerizonWireless must have heard through the digital grapevine (or my Spotify data usage on my cell) that this was the case. They were kind enough to supply me with a shiny new JBL Flip2 Wireless (bluetooth) speaker to take on my trip to the beach.
I took the device with me and jotted down my notes and findings and I’ll provide them here. To save you time, here’s the short version:
[hr top=”0″ bottom=”18″ /]
Good:
Loud, clear, full sound with minimal distortion until high volume.
Bad:
Actual battery life varies between 3.5-5 hours. Charger does not fit in carry case.
Overall Verdict:
I like it a lot, nice and portable, great sound, and the price is half of the slightly nicer UEBoom.
[hr top=”0″ bottom=”18″ /]
I’ve broken this review into the main sections of observations on the use and experience when using the JBL Flip2.
About the device:
The JBL Flip2 gets its name from its ability to be used either laying flat (horizontally) or standing on one end (vertically). It has a soft rubber coating on the ends that keeps it nicely secured when in either position, while keeping vibrations under control when the system generates bass. Connecting to the device via bluetooth is easy using either traditional methods of pairing or by using the NFC system. The JBL Flip2 packs 2 40mm drivers and a tuned bass port into a 6.25″ x 2.5″ cylinder (which is smaller than the dimensions mentioned on the sales site). The portable speaker system also functions as a bluetooth speakerphone. The system charges using a standard USB Micro charger and features a 1/8″ auxiliary port for non-wireless audio sources. The end of the device has a bluetooth pair button, a power button, and a speakerphone button.
[hr top=”0″ bottom=”18″ /]
Sound quality:
If you’re on your computer, you can click on the album covers to listen to the music selections on Amazon Digital Music
For the first test of sound quality, I utilized my nice quiet office to really get a feel for the detail the speaker could provide. My initial thought was that in this small room the volume is massive. It’s very adequately loud for my office which is a 10’x10’x9′ space. Even at near full volume, there was only minimally detectable distortion in sound. The sound is quite full, even when playing something as poorly mixed as Europe – The final countdown at full blast.
My next test was Louis Armstrong’s version of Summertime feat. Ella Fitzgerald, the remastered version of the 1957 recording. The volume was quite loud yet the vocals are incredibly clear. Subtle drum and high hat and vibraphone come through the strings in the mix nicely. The upright bass is also clear, I can hear the buzz on the fingerboard. Awesome.
The next track was Frank Glazer’s rendition of Erik Satie’s Trois Gymnopédies: Gymnopédie No. 1. The piano sounds full and haunting. The detail in the recording really comes out. I can hear his piano hammers rebounding, also creaks from the piano bench. These are all good things, the amount of sound dimension from such a small device, over wireless no doubt is tough to achieve. At higher volume (80%+) the left hand notes cause a slight distortion, and much of the clarity is lost. However, overall sound quality is still fantastic.
A major departure from the solemn rainy-day music from Frank Glazer, the next track was The Flaming Lips’ – The Sparrow looks up at the Machine. This song is designed to sound distorted. However it seems to be too much for the flip. The previously clear-ish vocals are buried in the fuzz from the mix. This could be just the nature of pushing so much noise through 2 40mm drivers. The mix is very hard clipped; most definition is lost at high volume.
Outdoors at the beach, the sound was sufficiently loud enough for non-distorted listening even during high wind and surf noise. The range of sound was about 15 feet.
[hr top=”0″ bottom=”18″ /]
Battery/Power:
The device had zero charge when I took it from the package, so this was a perfect time to test charge time. It took 1.5 hours to charge from dead to full charge using a 2A USB micro wall charger.
My first battery life test started at 7:05am and ended with a zero battery shutdown at 11:53am – 4.5-5 hour battery life, just like it says on the spec sheet.
At the beach we only had access to a 1A USB micro wall charger, charging time was upwards of 3 hours, and battery life after that charge was only 3.5 hours.
Charging using a laptop USB port made almost no progress at all before we gave up.
Another important thing to note is the very nice hard leather case provided by JBL to protect the speaker, has no space for the factory provided USB micro charger. Making it difficult to carry with the speaker.
[hr top=”0″ bottom=”18″ /]
Range:
Bluetooth range is as advertised, about 25-30 feet. In my house, I could get about 15 paces away from the unit (2 rooms away) before audio degraded and eventually stopped.
[hr top=”0″ bottom=”18″ /]
Other observations:
The price is decent, I’d say it’s definitely worth it. At the time of posting this review it’s on sale at VerizonWireless for $89.99.
Pairing multiple devices to the unit will cause them to fight for the output, it gets a little weird sometimes when two devices try to send different streams.
It took more to explain to the normal user what NFC was than it was worth. Most users just used the standard bluetooth pairing method.
I personally dislike the lack of play/pause and next track controls on the unit, and feel the speakerphone is useless. If you’re paired and listening to music, you may not have time to think about switching your bluetooth audio source before answering a call. Though, people on the other end said I sounded loud and clear.
Let’s say you have an Amazon EC2 Bitnami WordPress image, and you need to relocate your url to a new hostname, whether it be for rebranding or simplification.
You can force your URL to instantly redirect to your new domain name.
In this example let’s assume:
The new domain name points to the same server your old one was. (for the example, we’ll call it jasonheckmanoldsite.com)
You only have one WordPress vhost on this install. (a standard bitnami WordPress app roll out)
You have already pointed your new DNS name to your A record (jasonheckmanoldsite.com and jasonheckmannewsite.com both point to the same instance)
Remember to update the www.jasonheckmannewsite.com fields to match your desired new hostname.
What this snippet does is fairly simple. IF the http host does not equal ‘www.jasonheckmannewsite.com’ change it to that.
Once you’ve saved your changes. You need to restart apache.
#sudo /opt/bitnami/ctlscript.sh restart apache
For best performance, you should also update your WordPress configuration to point to the new hostname in the WordPress url and site url (set in settings/general).
Don’t forget to save your server some work by also updating all of the URLs throughout your content.